这一章是加餐,主要是给大家介绍一下如何使用Python SDK来操作我们之前实现的LSM-Tree-KV存储。
代码仓库:ToniXWD/toni-lsm: A KV storage engine based on LSM Tree, supporting Redis RESP 感谢您的 Star!
欢迎支持本项目同步更新的从零开始实现的视频教程:https://avo6166ew2u.feishu.cn/docx/LXmVdezdsoTBRaxC97WcHwGunOc
欢迎加入讨论群:Toni-LSM项目交流群
1 SDK 的作用 Python SDK的作用是提供一个简单易用的接口,让用户可以使用Python这样的脚本语言方便地使用我们实现的LSM-Tree-KV存储。通常来说, 成熟的数据库等基础设施都会提供类似Python或者JavaScript这样的脚本语言的SDK,方便用户进行二次开发和使用。否则, 就只能使用C++这样的编译型语言来进行开发,或者调用动态链接库的接口,这样会比较麻烦。
这里我选择Python的SDk, 主要原因是Python的语法简单易懂,且有丰富的第三方库支持, 并且脚本语言也非常方便, 我自己调试的时候也更想用Python先验证一些流程的正确性, 然后再到具体的错误流程中进行C++的单步调试。
C/C++到Python的SDK开发主要是通过pybind11这个库来实现的。pybind11是一个轻量级的库,可以让我们很方便地将C++代码暴露给Python,并且支持大部分的C++特性,包括类、函数、模板等。本章接下来的内容主要是介绍如何使用pybind11来实现一个简单的Python SDK,并且提供一些简单的示例代码来演示如何使用这个SDK。
2 pybind11 简介 2.1 pybind11 是什么 pybind11 是一个用于将 C++ 函数、类、模块 暴露给 Python 调用 的轻量级头文件库。它的目标是:
简洁语法 :像写 Python 模块一样写 C++ 绑定。无依赖性 :只需要头文件,无需链接库。性能极高 :性能几乎与纯 C++ 接近。
适用于以下场景:
Python 调用高性能 C++ 模块(如计算密集型任务)
Python 扩展模块编写(替代 CPython 的复杂 C API)
将现有 C++ 库封装为 Python 模块
2.2 安装与环境配置 安装 Python 端 pybind11(用于提供 --includes 编译选项):
获取 C++ 头文件(两种方式):
使用 pip 安装版本,编译时用 python -m pybind11 --includes
或者 clone 官方仓库:1 git clone https://github.com/pybind/pybind11.git
这里我们在项目中可以用xmake的包管理工具添加依赖:
1 2 3 4 5 6 add_requires("pybind11" ) target("lsm_pybind" ) ... add_packages("pybind11" ) ...
2.3 示例:绑定 C++ 函数 📄 example.cpp 文件:
1 2 3 4 5 6 7 8 9 10 11 12 13 14 #include <pybind11/pybind11.h> int add (int i, int j) return i + j; } PYBIND11_MODULE (example, m) { m.doc () = "pybind11 example plugin" ; m.def ("add" , &add, "A function that adds two numbers" ); }
🚀 编译命令(Linux/macOS):
1
2
3
c++ -O3 -Wall -shared -std=c++11 -fPIC \ $(python3 -m pybind11 --includes) example.cpp \ -o example$(python3-config --extension-suffix)
📌 说明 :
-O3:优化等级-fPIC:生成与位置无关的代码--extension-suffix:生成正确的 .so 或 .pyd 文件名
🐍 在 Python 中使用
1
2
import exampleprint (example.add(3 , 4 ))
2.4 绑定类(C++ 类 → Python 类) 📄 example.cpp 中绑定类:
1 2 3 4 5 6 7 8 9 10 11 12 13 14 15 16 17 18 19 20 #include <pybind11/pybind11.h> using namespace pybind11;class Pet {public : Pet (const std::string &name) : name (name) {} void setName (const std::string &name_) const std::string &getName () const return name; } private : std::string name; }; PYBIND11_MODULE (example, m) { class_ <Pet>(m, "Pet" ) .def (init <const std::string &>()) .def ("setName" , &Pet::setName) .def ("getName" , &Pet::getName); }
🐍 Python 中使用:
1
2
3
4
5
6
import exampledog = example.Pet("Buddy" ) print (dog.getName()) dog.setName("Rocky" ) print (dog.getName())
📌 关键语法说明 :
class_<T>(module, "Python类名"):绑定 C++ 类.def(init<Args...>()):绑定构造函数.def("方法名", &方法指针):绑定成员方法
2.5 传递 STL 类型 pybind11 支持常见 STL 类型的自动转换:
1 2 3 4 5 6 7 8 9 10 11 #include <pybind11/pybind11.h> #include <pybind11/stl.h> #include <vector> std::vector<int > generate () { return {1 , 2 , 3 , 4 }; } PYBIND11_MODULE (example, m) { m.def ("generate" , &generate); }
Python 使用:
1 print (example.generate())
2.6 总结
功能
语法
说明
绑定函数
m.def("name", &func)将 C++ 函数暴露给 Python
绑定类
class_<T>(m, "Class")创建 Python 类
构造函数
.def(init<Args...>())构造器绑定
成员方法
.def("name", &method)类成员方法绑定
STL支持
#include <pybind11/stl.h>启用 vector/map/list 自动转换
NumPy支持
#include <pybind11/numpy.h>绑定 NumPy 数组
3 Python SDK 实现 3.1 SDK 文件夹结构 1 2 3 4 5 6 7 8 9 10 11 12 sdk/ ├── lsm_pybind.cpp ├── tonilsm/ │ ├── __init__.py │ ├── tonilsm/ │ │ ├── __init__.py │ │ ├── __init__.pyi │ │ └── core/ ├── └setup.py xmake.lua src/ include/
这里对每个模块说明如下:
sdk/:SDK的根目录
lsm_pybind.cpp:SDK的绑定入口文件,主要是将C++的类和函数绑定到Python中tonilsm/:Python模块的目录,包含了Python模块的核心代码和类型提示文件,以及类型提示文件
tonilsm/__init__.py:Python模块的安装脚本,主要是将tonilsm模块导入到Python中tonilsm/__init__.pyi:类型提示文件,主要是给Python的IDE提供类型提示tonilsm/core/:编译产物目录,主要是存放编译后的Python模块setup.py:Python模块的安装脚本,主要是将tonilsm模块安装到Python中
xmake.lua:xmake的构建配置文件,主要是配置C++的编译选项和依赖
3.2 代码绑定 3.2.1 代码绑定的C++代码 这里我们只需要将lsm/engine.h 中的类和函数绑定到 Python 中即可, 但由于我们的主类类似beigin这样的迭代器返回的对象是一个迭代器, 且参数中包括一些自定义的隔离级别的枚举, 所以我们需要先将这些自定义数据类型也绑定到 Python 中。
1 2 3 4 5 6 7 8 9 10 11 12 13 14 15 16 17 18 19 20 21 22 23 24 25 26 27 28 29 30 31 32 33 34 35 36 37 38 39 40 41 42 43 44 45 46 47 48 49 50 51 52 53 54 55 56 57 58 #include "../include/lsm/engine.h" #include "../include/lsm/level_iterator.h" #include <pybind11/functional.h> #include <pybind11/pybind11.h> #include <pybind11/stl.h> namespace py = pybind11;void bind_TwoMergeIterator (py::module &m) py::class_ <TwoMergeIterator>(m, "TwoMergeIterator" ) .def ("__iter__" , [](TwoMergeIterator &it) { return ⁢ }) .def ("__next__" , [](TwoMergeIterator &it) { if (!it.is_valid ()) throw py::stop_iteration (); auto kv = *it; ++it; return py::make_tuple (kv.first, kv.second); }); } void bind_Level_Iterator (py::module &m) py::class_ <Level_Iterator>(m, "Level_Iterator" ) .def ("__iter__" , [](Level_Iterator &it) { return ⁢ }) .def ("__next__" , [](Level_Iterator &it) { if (!it.is_valid ()) throw py::stop_iteration (); auto kv = *it; ++it; return py::make_tuple (kv.first, kv.second); }); } class TranContext ;void bind_TranContext (py::module &m) py::class_<TranContext, std::shared_ptr<TranContext>>(m, "TranContext" ) .def ("commit" , &TranContext::commit, py::arg ("test_fail" ) = false ) .def ("abort" , &TranContext::abort) .def ("get" , &TranContext::get) .def ("remove" , &TranContext::remove) .def ("put" , &TranContext::put); } void bind_IsolationLevel (py::module &m) py::enum_ <IsolationLevel>(m, "IsolationLevel" ) .value ("READ_UNCOMMITTED" , IsolationLevel::READ_UNCOMMITTED) .value ("READ_COMMITTED" , IsolationLevel::READ_COMMITTED) .value ("REPEATABLE_READ" , IsolationLevel::REPEATABLE_READ) .value ("SERIALIZABLE" , IsolationLevel::SERIALIZABLE) .export_values (); }
pybind11 语法解释:
py::class_: 用于将 C++ 类暴露给 Python。第一个参数是 C++ 类类型,第二个参数是 Python 类的名称。def(): 用于绑定方法或函数。例如,.def(“方法名”, &类::方法) 将 C++ 方法绑定到 Python 方法。py::arg(): 允许指定默认参数。例如,py::arg(“test_fail”) = false 设置 test_fail 参数的默认值。py::make_tuple(): 将 C++ 元组转换为 Python 元组,方便返回多个值。py::stop_iteration(): 用于在 Python 中信号迭代结束,类似于抛出 StopIteration 异常。py::enum_: 用于将 C++ 枚举暴露给 Python。每个 .value() 调用将 C++ 枚举常量映射到 Python 枚举常量。export_values(): 导出所有定义的枚举值,以便可以直接访问,而不需要使用枚举名称前缀。
在此后, 我们需要将LSM这个对外暴露的C++类绑定到Python中, 这里我们只需要将LSM类的构造函数和一些对外暴露的接口绑定到Python中即可, 具体代码如下:
1 2 3 4 5 6 7 8 9 10 11 12 13 14 15 16 17 18 19 20 21 22 23 24 25 26 27 28 29 30 31 32 33 34 PYBIND11_MODULE (lsm_pybind, m) { bind_TwoMergeIterator (m); bind_Level_Iterator (m); bind_TranContext (m); bind_IsolationLevel (m); py::class_ <LSM>(m, "LSM" ) .def (py::init <const std::string &>()) .def ("put" , &LSM::put, py::arg ("key" ), py::arg ("value" ), "Insert a key-value pair (bytes type)" ) .def ("get" , &LSM::get, py::arg ("key" ), "Get value by key, returns None if not found" ) .def ("remove" , &LSM::remove, py::arg ("key" ), "Delete a key" ) .def ("put_batch" , &LSM::put_batch, py::arg ("kvs" ), "Batch insert key-value pairs" ) .def ("remove_batch" , &LSM::remove_batch, py::arg ("keys" ), "Batch delete keys" ) .def ("begin" , &LSM::begin, py::arg ("tranc_id" ), "Start an iterator with transaction ID" ) .def ("end" , &LSM::end, "Get end iterator" ) .def ("begin_tran" , &LSM::begin_tran, py::arg ("isolation_level" ), "Start a transaction" ) .def ("clear" , &LSM::clear, "Clear all data" ) .def ("flush" , &LSM::flush, "Flush memory table to disk" ) .def ("flush_all" , &LSM::flush_all, "Flush all pending data" ); }
3.2.2 编译为动态链接库 我们做的这些绑定操作都需要编译为动态链接库, 这里我们使用xmake来编译, 具体的xmake.lua文件如下:
1 2 3 4 5 6 7 8 9 10 11 target("lsm_pybind" ) set_kind("shared" ) add_files("sdk/lsm_pybind.cpp" ) add_packages("pybind11" ) add_deps("lsm_shared" ) add_includedirs("include" , {public = true }) set_targetdir("$(buildir)/lib" ) set_filename("lsm_pybind.so" ) add_ldflags("-Wl,-rpath,$ORIGIN" ) add_defines("TONILSM_EXPORT=__attribute__((visibility(\"default\")))" ) add_cxxflags("-fvisibility=hidden" )
3.3 Python包组织 3.3.1 模块结构 在有了这个动态链接库后, 我们需要将这个动态链接库组织成一个Python包, 这部分模块结构为:
1
2
3
4
5
6
7
8
9
10
tonilsm ├── tonilsm │ ├── core │ │ ├── __init__.py │ │ ├── __init__.pyi │ │ ├── lib │ │ │ ├── liblsm_shared.so │ │ │ └── lsm_pybind.so │ ├── __init__.py │ └── setup.py
这里忽略了自动生成和缓存的文件夹和文件
这里简单介绍下这部分的模块:
3.3.2 模块导出 tonilsm/__init__.py:
1 2 3 4 from .core import LSM, IsolationLevel __all__ = ["LSM" , "IsolationLevel" ]
这里的作用是将 LSM、IsolationLevel 模块导入到 tonilsm 包中,这样用户可以直接使用 from tonilsm import ... 的方式来访问核心功能。
3.3.3 动态链接库加载 在 tonilsm/core/__init__.py 中,我们需要加载动态链接库 lsm_pybind.so,以便在 Python 中使用 C++ 实现的功能。我们可以使用 importlib 模块来动态加载这个库。
tonilsm/core/__init__.py:
1
2
3
4
5
6
7
8
9
10
11
12
13
14
15
16
17
18
19
20
import osimport sysimport importlib.utilcurrent_dir = os.path.dirname(os.path.abspath(__file__)) lib_dir = os.path.join(current_dir, 'lib' ) sys.path.append(lib_dir) spec = importlib.util.spec_from_file_location("lsm_pybind" , os.path.join(lib_dir, "lsm_pybind.so" )) lsm_pybind = importlib.util.module_from_spec(spec) spec.loader.exec_module(lsm_pybind) from lsm_pybind import LSM, TwoMergeIterator, Level_Iterator, TranContext, IsolationLevel__all__ = ['LSM' , 'TwoMergeIterator' , 'Level_Iterator' , 'TranContext' , 'IsolationLevel' ]
3.3.4 类型提示文件 类型提示文件 tonilsm/core/__init__.pyi 用于提供类型信息,帮助 IDE 和静态类型检查工具(如 mypy)更好地理解代码结构。这个文件的内容与 tonilsm/core/__init__.py 中的类和函数定义相对应。LSM 类、TwoMergeIterator 类、Level_Iterator 类、TranContext 类和 IsolationLevel 枚举类型的接口。tonilsm/core/__init__.pyi 文件的内容如下:
1
2
3
4
5
6
7
8
9
10
11
12
13
14
15
16
17
18
19
20
21
22
23
24
25
26
27
28
29
30
31
32
33
34
35
36
from typing import *class LSM : def __init__ (self, path: str ) -> None : ... def put (self, key: bytes , value: bytes ) -> None : ... def get (self, key: bytes ) -> Optional [bytes ]: ... def remove (self, key: bytes ) -> None : ... def put_batch (self, kvs: List [Tuple [bytes , bytes ]] ) -> None : ... def remove_batch (self, keys: List [bytes ] ) -> None : ... def begin (self, tranc_id: int ) -> 'TwoMergeIterator' : ... def end (self ) -> 'TwoMergeIterator' : ... def begin_tran (self, isolation_level: 'IsolationLevel' ) -> 'TranContext' : ... def clear (self ) -> None : ... def flush (self ) -> None : ... def flush_all (self ) -> None : ... class TwoMergeIterator : def __iter__ (self ) -> 'TwoMergeIterator' : ... def __next__ (self ) -> Tuple [bytes , bytes ]: ... class Level_Iterator : def __iter__ (self ) -> 'Level_Iterator' : ... def __next__ (self ) -> Tuple [bytes , bytes ]: ... class TranContext : def commit (self, test_fail: bool = False ) -> None : ... def abort (self ) -> None : ... def get (self, key: bytes ) -> Optional [bytes ]: ... def remove (self, key: bytes ) -> None : ... def put (self, key: bytes , value: bytes ) -> None : ... class IsolationLevel (Enum ): READ_UNCOMMITTED: 'IsolationLevel' READ_COMMITTED: 'IsolationLevel' REPEATABLE_READ: 'IsolationLevel' SERIALIZABLE: 'IsolationLevel'
3.3.5 安装脚本 安装脚本 tonilsm/setup.py 用于构建和安装 Python 包。这个脚本使用 setuptools 构建 Python 包:
1
2
3
4
5
6
7
8
9
10
11
12
13
14
15
16
17
18
19
20
21
22
23
24
25
26
27
28
29
30
31
32
33
34
35
36
37
38
39
40
41
42
43
44
45
46
47
48
49
50
51
52
53
54
55
56
57
import osimport platformfrom setuptools import setup, find_packagesfrom setuptools.command.build_py import build_pyVERSION = "0.1.0" DESCRIPTION = "A Python binding for Toni's LSM Tree Storage Engine" class CustomBuild (build_py ): def run (self ): build_lib_dir = os.path.abspath(os.path.join(os.path.dirname(__file__), "../../build/lib" )) package_lib_dir = os.path.join(self.build_lib, "tonilsm/core/lib" ) self.mkpath(package_lib_dir) lib_files = [ ("liblsm_shared.so" , "liblsm_shared.so" ), ("lsm_pybind.so" , "lsm_pybind.so" ) ] for src_name, dst_name in lib_files: src = os.path.join(build_lib_dir, src_name) dst = os.path.join(package_lib_dir, dst_name) if os.path.exists(src): self.copy_file(src, dst) else : raise FileNotFoundError(f"Missing library file: {src} " ) super ().run() setup( name="tonilsm" , version=VERSION, description=DESCRIPTION, packages=find_packages(), package_data={ "tonilsm.core" : [ "lib/*.so" , "lib/*.dylib" , "lib/*.dll" , "lib/*.pyd" ] }, cmdclass={"build_py" : CustomBuild}, install_requires=["pybind11>=2.10" ], python_requires=">=3.8" , author="Your Name" , classifiers=[ "Development Status :: 3 - Alpha" , "Programming Language :: Python :: 3" , ] )
4 SDK 使用 现在我们可以直接通过Python来使用这个LSM存储引擎了, 这里我们给出一个简单的使用示例:
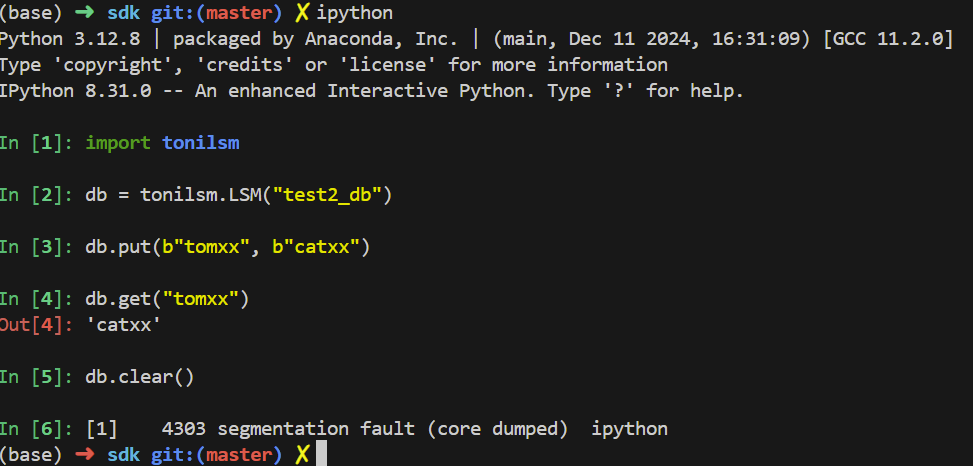
1
2
3
4
5
6
7
8
9
10
11
12
13
14
15
16
17
18
19
20
21
22
23
24
25
26
27
import tonilsmdb = tonilsm.LSM("test2_db" ) db.put(b"tomxx" , b"catxx" ) db.get("tomxx" ) t = db.begin_tran(isolation_level=tonilsm.IsolationLevel.READ_COMMITTED) t.get('tomxx' ) t.put('tomxx' , '1' ) t.get('tomxx' ) db.get("tomxx" ) t.commit() db.get("tomxx" )
但这里其实有一个bug:
调用clear方法后直接core dump了, 这个clear函数在C++文件中是正常使用的, 但不知道为什么到Python层就core dump了, 这个我暂时不知道什么原因。如果有网页感兴趣,可以看看这个issue
5 总结 在这一章中,我们介绍了如何使用 pybind11 来将C++代码绑定到 Python 中,并且实现了一个简单的 Python SDK。我们还介绍了如何组织 Python 包的结构,以及如何使用 setuptools 来构建和安装 Python 包。
这一章算是加餐内容吧, 基础的Python SDK已经实现了, 但有一些细节的bug和优化没有在之前的文章中提及, 因为比较琐碎, 写起来也比较复杂。
如果本项目有帮到你,请给个star吧,您的支持是我继续维护和开发这个项目的动力。如果你想自己从零开始手敲代码实现这个项目,欢迎支持我的付费视频课程:https://avo6166ew2u.feishu.cn/docx/LXmVdezdsoTBRaxC97WcHwGunOc