1 wsl是什么?
wsl的官方文档点这里: https://learn.microsoft.com/zh-cn/windows/wsl/
官方称之为适用于 Linux 的 Windows 子系统文档, 我们把他当成一个和windows为什么我们要使用wsl呢?对于我个人而言,wsl相比VMWarwe存在如下几个优势:
- 文件与环境共享
WSL与Windows系统紧密集成,允许用户在Windows和Linux系统之间无缝地运行命令和程序,共享文件系统,甚至可以在Windows中运行 Linux 应用。例如, 你可以在wsl中使用explorer.exe .使用资源管理器打开虚拟机中的文件夹。你可以使用mnt/路径访问宿主机文件系统等待。 - VSCode完美兼容
VSCode的插件完美兼容wsl, 你可以在wsl的终端输入code .直接唤起VSCode, 此外Docker Desktop也使用wsl2作为后端 - 支持CUDA
NVIDIA官方提供了wsl的cuda程序包, 这意味着可以在wsl中运行各种主流的深度学习框架, 如Pytorch和TensorFlow - 轻量
相比VMWarwe, wsl消耗的系统资源更少,甚至可以开着wsl打FIFA
2 安装
2.1 前置要求
2.1.1 启用Windows功能
系统搜索启用或关闭Windows功能,如下图开启功能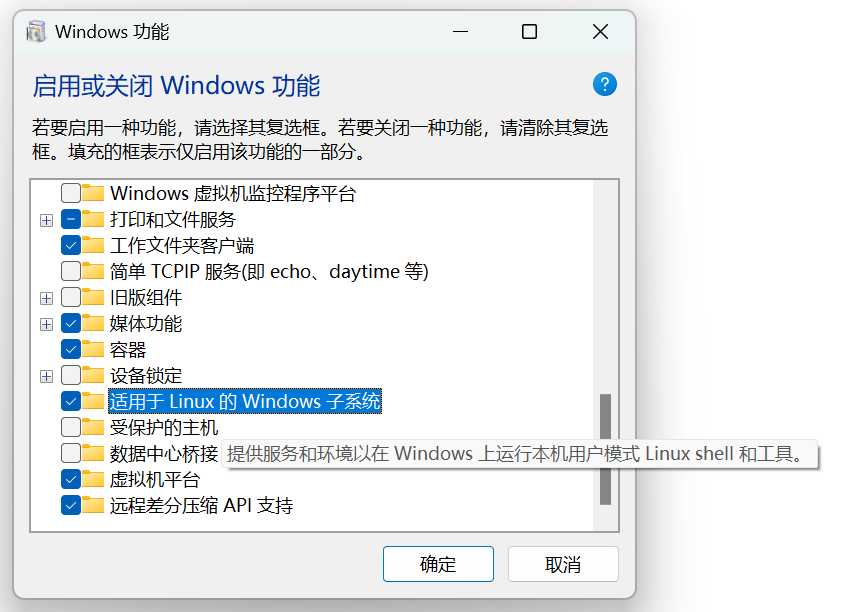
2.1.2 BIOS开启CPU虚拟化功能
不同的主板厂商BIOS界面设置不同,大体上的位置可参考下图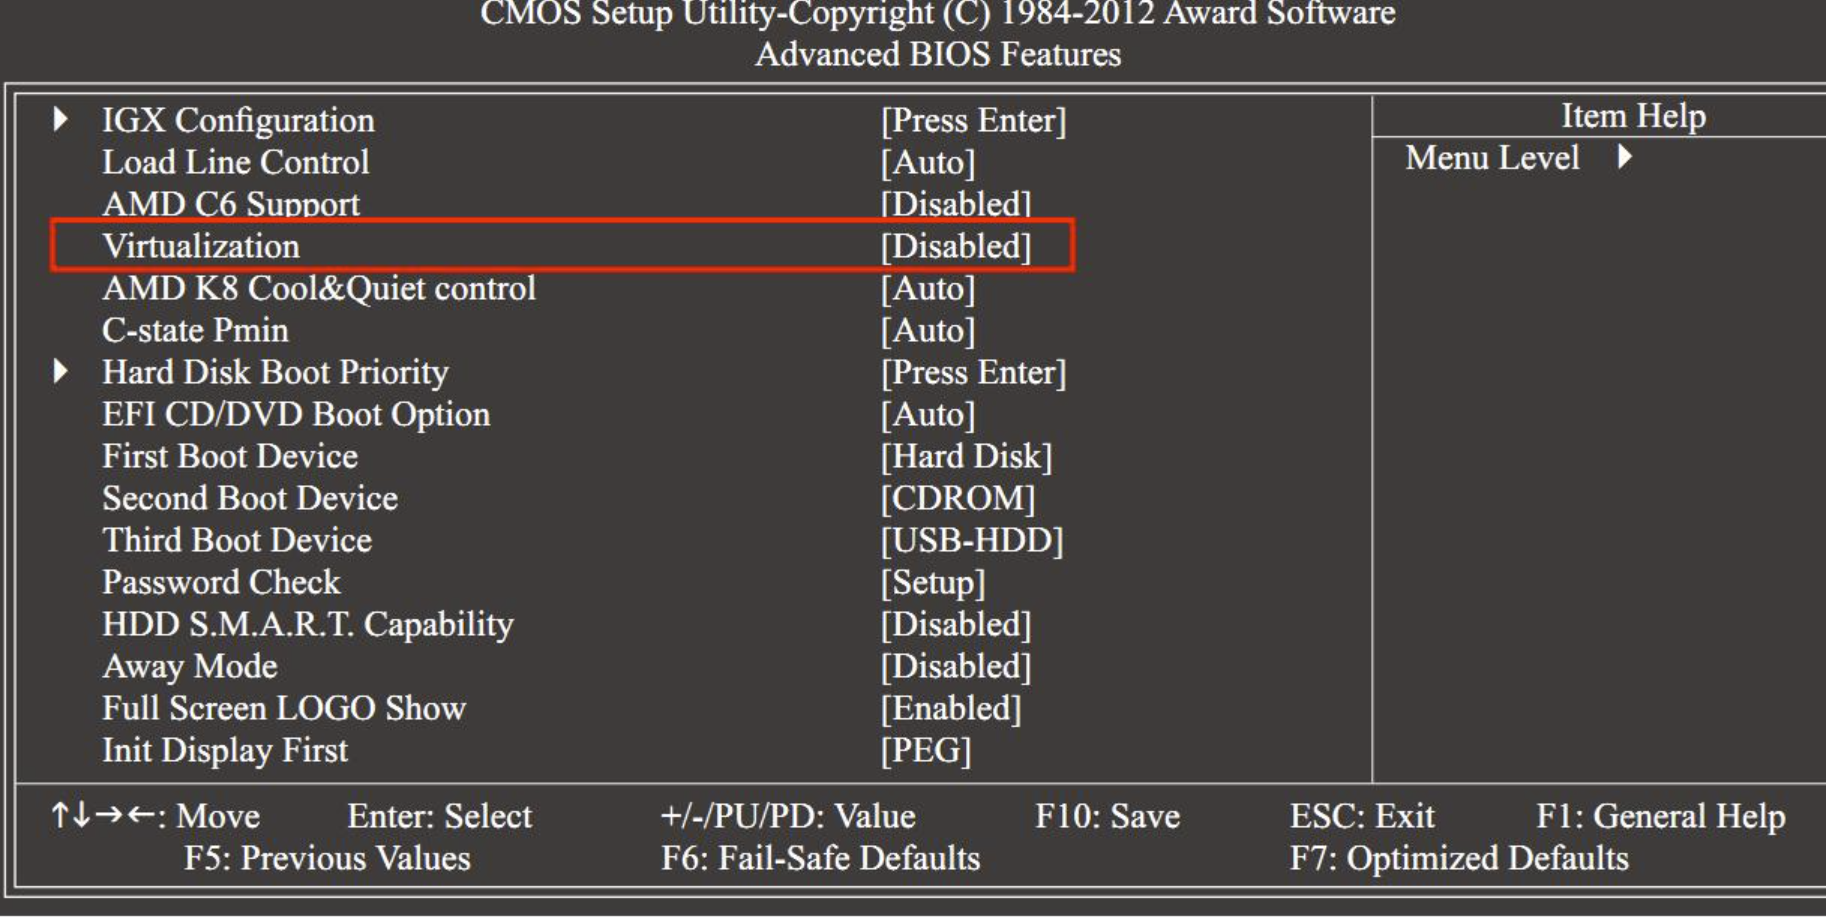
2.2 下载Linux 内核更新包(可选)
如果后续操作失败了, 需要下载Linux 内核更新包: https://learn.microsoft.com/zh-cn/windows/wsl/install-manual#step-4---download-the-linux-kernel-update-package
2.3 安装指令
参考 https://learn.microsoft.com/zh-cn/windows/wsl/install 即可, 简单说就是
1 | wsl --install |
其中, --参数都可以用-加首字母代替。
另外, win10环境下强推Windows 终端
3 基本命令
1 | wsl |
4 配置文件
配置文件分为2中, 名为.wslconfig的全局配置文件和针对每个方向版的配置文件wsl.conf
4.1 .wslconfig
.wslconfig 用于在 WSL 2 上运行的所有已安装发行版中配置全局设置, 其路径在windows系统的用户目录下, 下面是我的全局配置.wslconfig:
1 | # windows用户目录下 |
4.2 wsl.conf
wsl.conf 文件会针对每个发行版配置设置, 路径在每个发行版的\etc\目录下, 例如我的wsl.conf如下:
1 | # "\\wsl.localhost\Ubuntu\etc\wsl.conf" |
官方也提供了更详细的一个配置文件案例:
1 | # Automatically mount Windows drive when the distribution is launched |
5 网络配置
5.1 代理设置
设置代理只需要导出环境变量即可, 以Clash代理的7890端口为例:
1 | export http_proxy=http://127.0.0.1:7890 |
类似的, 可以使用如下命令配置git代理:
1 | git config --global http.proxy ${PROXY_HTTP} |
如同Linux物理机一样, 在.bashrc中配置环境变量即可永久生效
5.2 固定IP
默认情况下, WSL实例的 IP 地址不是固定的。每次 WSL 实例启动时,它通常会从 Windows 主机的一个虚拟网络适配器获得一个新的 IP 地址。这个虚拟网络适配器充当 DHCP 服务器,为 WSL 实例分配 IP 地址。
最常用的方案是与宿主机共享IP, 这可以通过配置wslconfig文件做到:
在用户目录下的.wslconfig文件中添加如下内容:
1 | [experimental] |
此后启动wsl, 其与 Windows 主机的网络互通而且 IP 地址相同了
另外还有别的方式固定IP
- 使用桥接模式, 参考这篇文章: https://blog.csdn.net/keyiis_sh/article/details/113819244
- 配置虚拟网络, 参考这篇文章: http://www.manongjc.com/detail/28-qmgskvmcxbjzfaj.html
5.3 端口映射
端口映射命令如下:
建立映射
1 | netsh interface portproxy add v4tov4 listenport=80 listenaddress=0.0.0.0 connectport=80 connectaddress=172.29.41.233 |
其中172.29.41.233是wsl中的ip地址, 第一个80表示宿主机端口,第二个80表示wsl端口
查看已有的映射
1 | netsh interface portproxy show all |
移除映射:
1 | netsh interface portproxy delete v4tov4 listenport=80 listenaddress=0.0.0.0 |
6 磁盘管理
6.1 安装或迁移wsl到其他磁盘
wsl默认安装在C盘, …
WSL会在宿主机上创建一个虚拟硬盘文件(通常是一个名为 ext4.vhdx 的文件),用于存储 Linux 发行版的文件系统, 而这个文件貌似是以追加写入的方式运行的, 因此容量会越来越大。因此将其安装在非系统盘是十分必要的。
最简单的方式是手动迁移vhdx文件,注销Linux发行版, 再重新导入。此操作对于老旧版本的wsl是不适用的!
- 方法1 直接迁移ext4.vhdx文件
例如, 我的wsl文件位于"C:\Ubuntu-20.04\ext4.vhdx"下, 先进行如下操作
- 复制
ext4.vhdx文件到指定路径1
cp "C:\Ubuntu-20.04\ext4.vhdx" <targetPath>
- 注销对应的发行版
1
wsl --unregister Ubuntu-20.04
- 重新导入
1
wsl --import-in-place Ubuntu-20.04 <targetPath>
这时wsl发行版已经被迁移到其他磁盘了, 这种方法的优势是原位导入, 也就是<targetPath>就是wsl真正的磁盘文件了, 不过确定是只能用于ext4 文件系统类型格式。
- 方法2 导出镜像通过
1
2
3
4
5wsl --export <Distribution Name> <FileName>
# 导出:
wsl --import <Distribution Name> <InstallLocation> <FileName>
# 导入--import可以看出, 这种方法是将安装到了<InstallLocation>, 可以看作多复制了一份, 因此如果我们的wsl无比庞大时, 这样的操作是很费时间的
6.2 清理vhdx磁盘空间
如前文所述, WSL 不会自动收缩vhdx文件的大小, 我们需要手动压缩:
使用管理员打开powershell:
1 | # 关闭WSL |
6.3 设置磁盘稀疏以自动回收
在.wslconfig中如下配置:
1 | [experimental] |
7 安装CUDA
此过程较为繁琐, 且方案迭代过快, 因此给出官方文档: https://docs.nvidia.com/cuda/wsl-user-guide/index.html
以下的过程仅供参考:
确保Windows中安装了NVIDIA的显卡驱动(不需要安装cuda)
在官网下载适用于wsl的cuda toolkit,
网址: https://developer.nvidia.com/cuda-downloads?target_os=Linux&target_arch=x86_64&Distribution=WSL-Ubuntu&target_version=2.0&target_type=deb_local如下选择:
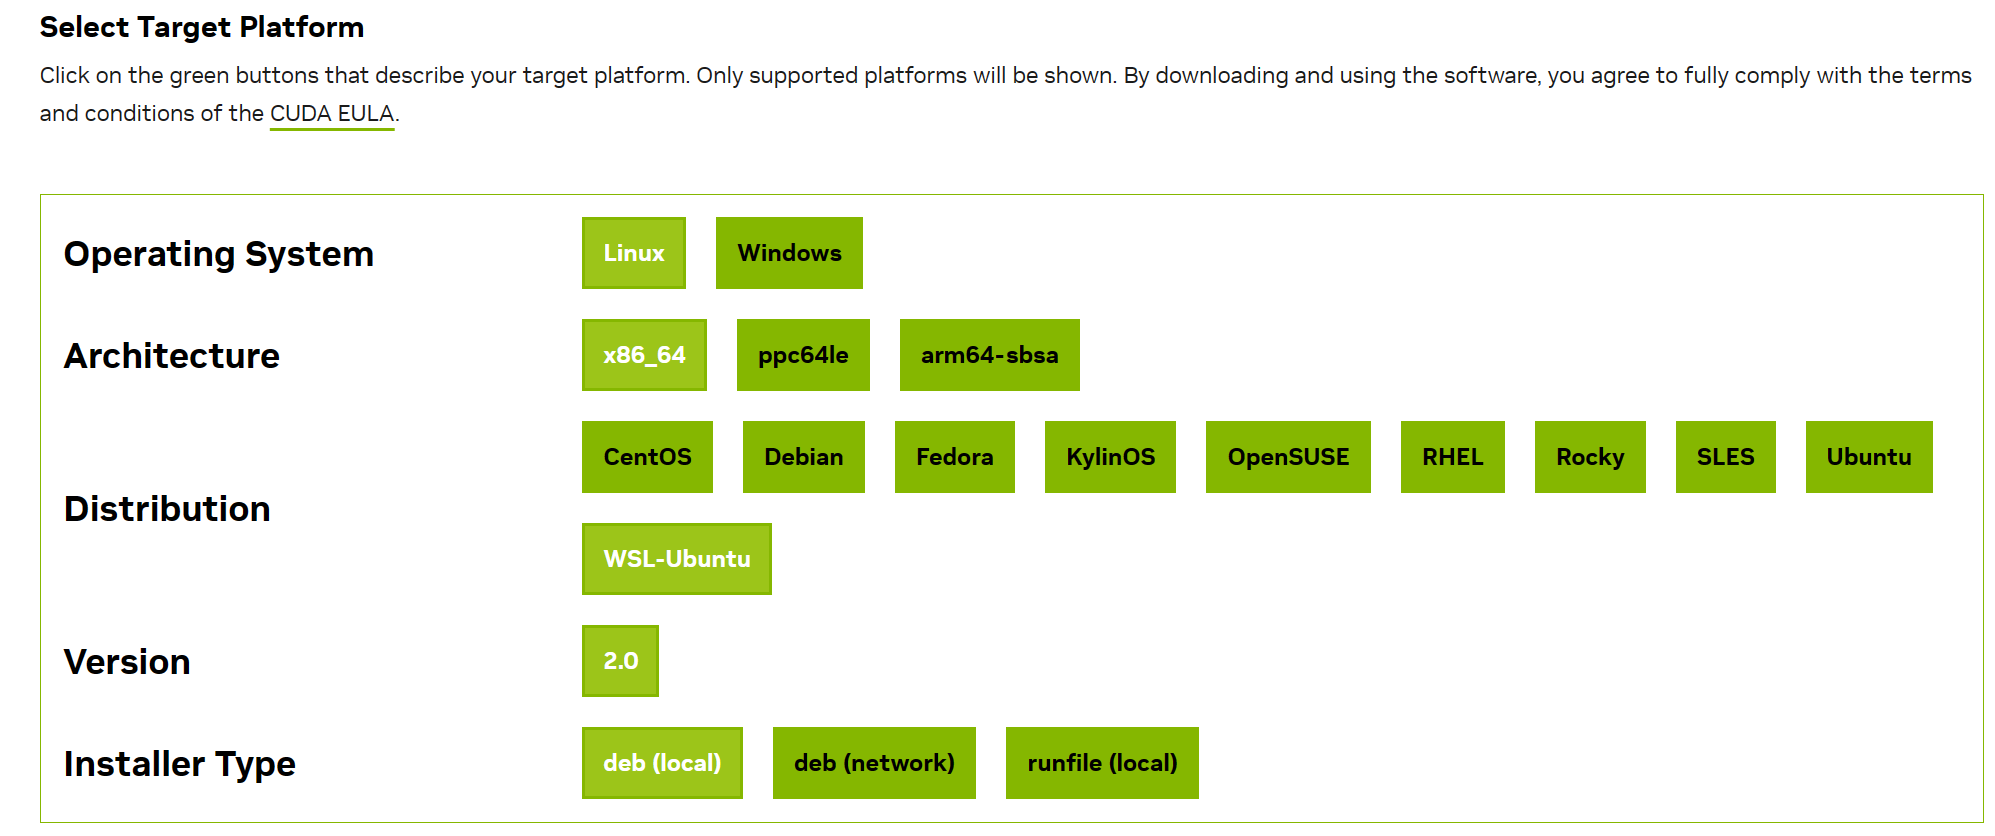
安装官网指令进行安装
1
2
3
4
5
6
7wget https://developer.download.nvidia.com/compute/cuda/repos/wsl-ubuntu/x86_64/cuda-wsl-ubuntu.pin
sudo mv cuda-wsl-ubuntu.pin /etc/apt/preferences.d/cuda-repository-pin-600
wget https://developer.download.nvidia.com/compute/cuda/12.3.1/local_installers/cuda-repo-wsl-ubuntu-12-3-local_12.3.1-1_amd64.deb
sudo dpkg -i cuda-repo-wsl-ubuntu-12-3-local_12.3.1-1_amd64.deb
sudo cp /var/cuda-repo-wsl-ubuntu-12-3-local/cuda-*-keyring.gpg /usr/share/keyrings/
sudo apt-get update
sudo apt-get -y install cuda-toolkit-12-3
8 第三方工具LxRunOffline
LxRunOffline是第三方的wsl管理工具,其能更方便我们管理wsl, 例如修改登录用户、安装非微软官方提供的Linux发行版等
Github仓库: https://github.com/DDoSolitary/LxRunOffline
下载地址: https://github.com/DDoSolitary/LxRunOffline/releases
安装建议下载编译好的二进制文件,较为简单就不演示了, 此处介绍其核心功能
LxRunOffline最主要的作用就是安装非微软官方提供的Linux发行版:1
LxRunOffline i -n archlinux -f {发行版镜像位置} -d <安装系统的位置> [-r 附加参数]
具体的发行版安装看这里: https://github.com/DDoSolitary/LxRunOffline/wiki
例如这篇文章介绍了如何使用LxRunOffline安装arch: https://zhuanlan.zhihu.com/p/417410431修改默认登录用户
1
2
3
4
5lxrunoffline su -n <发行版名字> -v <账户id>
```
其中`<账户id>`可以在`Linux`中通过`id`命令查询:
```bash
id -u 用户名
参考
https://learn.microsoft.com/zh-cn/windows/wsl/
https://www.cnblogs.com/tuilk/p/16287472.html
https://zhuanlan.zhihu.com/p/659074950
https://blog.csdn.net/u014752296/article/details/128484185
https://zhuanlan.zhihu.com/p/417410431
https://blog.csdn.net/m0_37605642/article/details/127812965
https://zhuanlan.zhihu.com/p/165508059
http://www.manongjc.com/detail/28-qmgskvmcxbjzfaj.html
https://www.cnblogs.com/trendyshuai/p/17018012.html
https://blog.csdn.net/keyiis_sh/article/details/113819244
https://blog.csdn.net/qq_32666519/article/details/127378873